Four Stratego Setup Examples to Copy
Each Stratego setup below is a complete, legal army: 40 pieces in your four rows, with the right number of every rank. Pick one that fits how you play, copy it square by square, and change it once regular opponents start to recognise it.
The grids use this game's own labels: 1 is the Marshal, 2 the General, 3 a Colonel, and so on down to 9 for a Scout, with S for the Spy, B for a Bomb and F for the Flag. If you learned the pieces with the Marshal as 10, read each number as 11 minus the label (a Scout is then 2), and the Spy becomes 1. The front row sits next to the lakes; the back row is nearest you.
1. Starter Stratego Setup for Your First Games
This example Stratego setup was written for this page. The Flag sits in the back-left corner, where two Bombs close it in. The opposite corner looks the same, two Bombs around a Sergeant, so an opponent who finds one bombed corner cannot be sure it is the right one. All five Miners wait in the back two rows. The Marshal covers the left lane, and the General stands in the middle lane with the Spy beside it.
- Good at: it is easy to remember, and nothing you cannot afford to lose stands in the front row.
- Weak spot: a Flag in a back corner is the first place an experienced player looks.
2. Vincent de Boer's Balanced Setup
This Stratego setup is one of Vincent de Boer's best-known layouts. The Flag sits in the middle of the back row with a Bomb on each side and a third in front of it. The Marshal and two Majors sit behind the right lake, the General and a Colonel back the middle lane, and lower ranks hold the left lane.
- Good at: every strong piece is close to where it may be needed, so the layout works for both attack and defence.
- Weak spot: it is a little predictable, and a layout this well known is easy to recognise.
3. Vincent de Boer's Corner Flag Setup
This second Stratego setup by Vincent de Boer puts the Flag in the back-right corner behind just two Bombs. The other four Bombs sit in the middle lane and along the left half of the back row, and the Marshal and the General both start in the front row, each behind a lake.
- Good at: the Marshal and the General are in play from the first moves, and the two Bombs in the middle lane slow an attack through the centre.
- Weak spot: a Flag in the corner is harder to defend.
4. Shoreline Bluff
This is a variation of the Shoreline Bluff, a layout built around one bluff. The Flag stands in the front row, right behind the left lake, boxed in by the lake and three Bombs. The Marshal and a Colonel stand next to that group, and more Bombs in the centre push the fighting out to the sides.
- Good at: opponents expect the Flag at the back, so most attacks go straight past it.
- Weak spot: the right side is thin, and a Miner that defuses the Bomb on the lane side reaches the Flag on its next move.
Which Stratego Setup Suits You
| Stratego setup | Flag | Bombs touching the Flag | Suits | Weak spot |
|---|---|---|---|---|
| Starter | Back-left corner | 2 | Your first games | Corner Flags are searched first |
| De Boer balanced | Back row, middle | 3 | All-round play | Well known, predictable |
| De Boer corner Flag | Back-right corner | 2 | Players who want their two strongest pieces in action early | Corner is hard to defend |
| Shoreline Bluff | Front row, behind a lake | 3 | Players who like to bluff | Weak right side |
Read the Board Before You Set Up
Every Stratego setup starts from the same shape: four rows of ten squares, with two lakes in front of columns 3-4 and 7-8. The lakes split your front into three lanes, two columns wide each: the left lane (columns 1-2), the middle lane (5-6) and the right lane (9-10).
A piece in the front row behind a lake can only be attacked from the side, so a strong piece behind a lake, like the Marshal in De Boer's grids, is safe from a head-on attack yet only one step from a lane. A good Stratego setup has at least one piece in each lane that can stop a raid.
Flag and Bomb Placement in a Stratego Setup
Wrap the Flag in Bombs on its open sides, and use the spare Bombs to make every guess about it harder. A Flag in a corner needs only two Bombs; a Flag in the middle of the back row needs three. A corner saves a Bomb, but every Bomb-wrapped Flag has the same cost: it is easy to predict.
The Bombs you do not need for the Flag are where a Stratego setup gets its bluff:
- A decoy group. Build a second Bomb shape that looks like a Flag nest, with a Sergeant or another middle rank waiting behind it to catch the Miner that comes to clear it.
- A closed lane. Two Bombs across one lane force your opponent to bring a Miner up before attacking there, while you defend the other two lanes.
- Clusters far apart. Build two or three Bomb clusters far from each other, sometimes with the Flag behind one of them and sometimes behind none.
One more idea: every piece you move proves it is not a Bomb. A Stratego setup that keeps some front pieces still for a while leaves the enemy guessing longer. What Bombs and Miners can do in a fight is covered in our Stratego rules.
Where Miners and Scouts Go in a Stratego Setup
Keep most of your Miners in the back two rows, and put a few Scouts in the front row. Scouts do their best work in the middle game and Miners are needed most in the endgame, which is why most Miners in the four grids above start in the back two rows. If the enemy Flag is wrapped in Bombs, only a Miner can open it, so losing every Miner early can cost you the game.
Front-row Scouts are cheap to spend: one attack on an unknown piece shows what it is. Keep two or three Scouts further back as well; the Shoreline Bluff above holds some in reserve for the endgame. More on spending them well is in our Stratego tips.
Marshal, General and Spy in Your Stratego Setup
Spread your strongest pieces across the lanes instead of stacking them together. One sound pattern puts the Marshal in one lane and the General and Spy in another, with at least one Colonel in the third. Do not set your strong pieces too far back, or they arrive too late when an attack breaks through your front.
Putting the Spy beside the General in your Stratego setup sets a trap. An enemy Marshal that attacks your General then stands next to your Spy, and a Spy that attacks the Marshal wins. The exact rule is on the rules of Stratego page.
How to Build a Stratego Setup in This Game
The setup screen opens with a default layout that is sorted by rank: the Marshal in the front-left corner, the Scouts in a block, and all six Bombs and the Flag in a line along the back row, with only one Bomb touching the Flag. Rearrange it before you press Start.
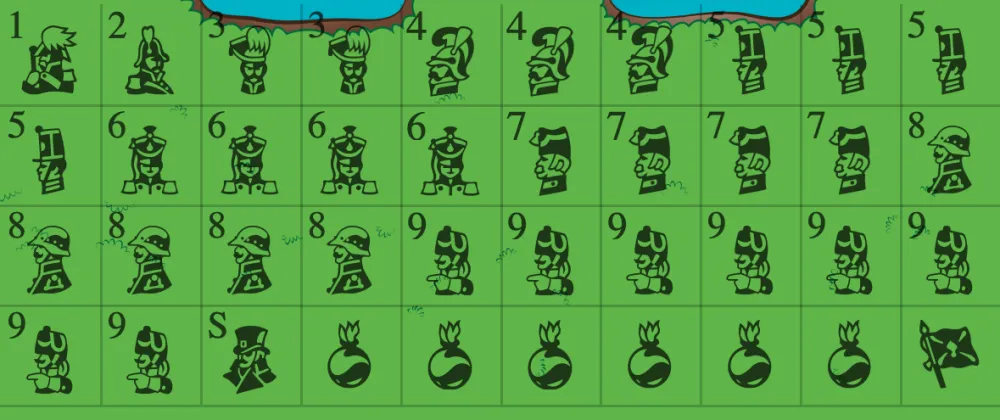
To copy a Stratego setup from this page, swap pieces two at a time. Clicking a piece and then a second one trades their places; dragging one onto the other does the same, and on a phone you tap the two pieces in turn. The homepage game has no random or preset button, so the layout is always your own; if you want one generated for you, Master of the Flag on our Stratego vs Computer page has an Auto-Arrange button.
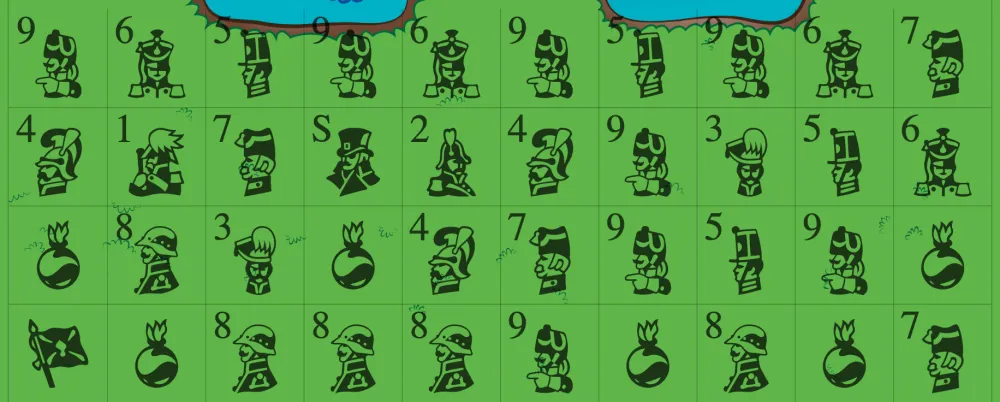
When you start a game, your Stratego setup is saved in your browser and comes back the next time you open the setup screen. Changes you make without starting a game are lost when the page reloads. Play Stratego online to try one of the layouts above, or play Stratego against the computer if you would rather face a computer opponent.
So Which Is the Best Stratego Setup?
The best Stratego setup is the one your opponent has not seen yet. Any Stratego setup loses its edge once someone learns where you hide the Flag. Start with the starter grid, move on to the published ones, and change the Flag corner and the Bomb pattern between games against the same person.
After the setup, the game is about collecting information and protecting your own, and our Stratego strategy guide picks up from the first move. When your favourite Stratego setup is ready, open the free Stratego game and press Start.